Export and import tools
Contents
Export and import tools#
Exporting a course#
Exporting a course means building a compressed file in .tar.gz format that contains all the contents, configurations, and files of a course to reuse it later on.
This process has no impact on the course that is exported.
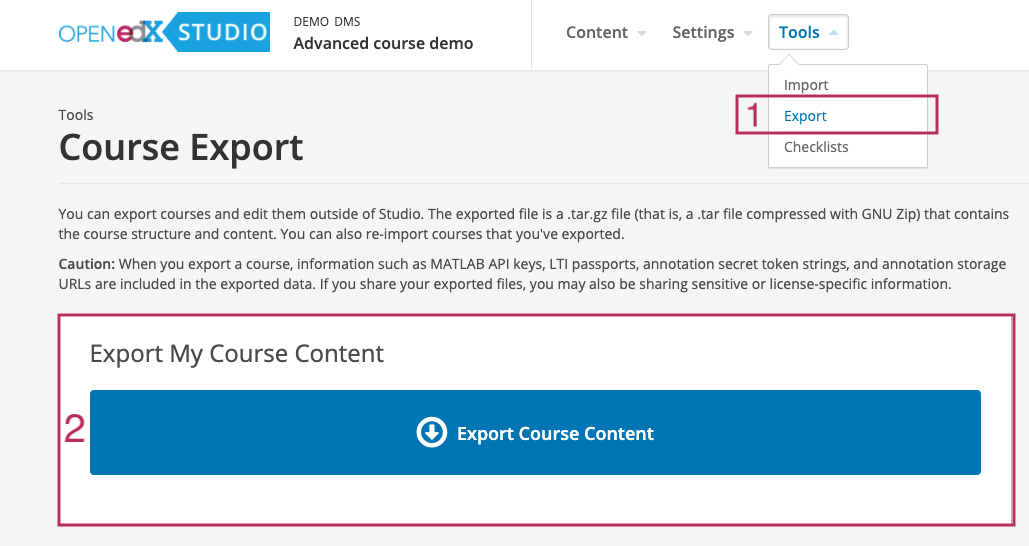
To export your course, follow these steps.
From the Tools menu, select Export.
Select Export Course Content.
When the export completes you can then access the .tar.gz file on your computer.

See also
This is documented in more detail in This section of the Open edX official Documentation.
Importing a course#
Importing a course means bringing into your course, a .tar.gz that was previously created with the export tool so that the contents and configurations in the file overwrite the ones in your course.
This process will likely alter your course significantly and the result cannot be undone, so it must be performed carefully and only when you are fully aware of the consequences.
See also
This is documented in more detail in This section of the Open edX official Documentation.
Troubleshooting errors during course imports#
Course imports may fail for some reasons. In this section, we will highlight the most common problems and provide the steps to bypass the error.
1) Unrecognized file names#
This is the most common issue when importing a course. It happens when course files have names with non-standard characters, including spaces, accents, etc.
To solve it, you should replace the file with a new one in which the name has been changed to include only standard characters numbers, and letters. Keep in mind that after changing the file you also need to set straight any reference to the file inside the course content.
Alternatively, you can accomplish the import process without changing every incorrectly named file and its references by following this procedure:
1- Unzip the contents of the .tar.gz file into a .tar file. 2- Extract the contents of the .tar file into multiple files. You will end up with a folder named “course”. 3- Open the course folder and find a sub folder called “static”. 4- Rename the folder to “static1”. 5- Pack the course folder back into a new .tar file. 6- Gzip the .tar file into a new .tar.gz file. 7- Use the new .tar.gz file in your import procedure. It should work correctly, except that the files will not end up in the Files and uploads page in the course in studio. 8- Drag and drop all the files that are still in the “static1” folder you renamed to the Files and uploads section of the course to upload them directly into the course.
This process will succeed in uploading the files even if the names have special characters. This will not solve the main issue so a new export/import of this same course will present the file name error again, but it will allow you to make the import without changing all the files/references.
2) Non-supported X-blocks#
The course was exported with certain X blocks that are not accepted on the site where it is being uploaded.
The solution here is to go back to the source site or course and remove the unsupported X blocks before making a new course export and then retry the import operation in the destination site/course.
